
Chainsaw Safety, Planning and Precision Felling Techniques
Chainsaw operators have to be able to think on their feet and adjust to their surroundings. Accidents and injuries can be dramatically reduced, and productivity increased, when workers have the knowledge, training and skills they need to properly operate a chainsaw. In the following article – the second part of a three-part series – I will discuss a variety of components related to safely operating a chainsaw, including what operators need to know about PPE, body positioning and reaction forces. I will also detail a five-step felling plan used by chainsaw operators around the world that you can adopt for your company’s use.
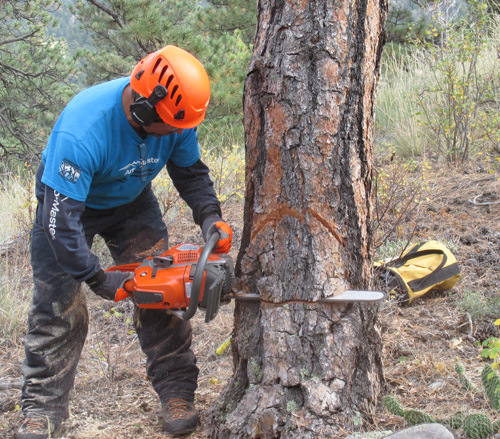
Appropriate PPE
Always wear appropriate personal protective equipment when operating a chainsaw, which includes a hard hat, eye protection, hearing protection, approved work boots and gloves. Good work gloves that provide for a solid grip and enhance work positioning are often required by employers. Leg protection, such as ballistic chaps or chainsaw pants, is required when running a chainsaw on the ground. However, leg protection is strongly recommended whenever running a chainsaw.
Proper Body Positioning
Proper hand and body positioning are key to the safe, effective use of a chainsaw. When operating a chainsaw, stand with feet firmly planted. Always operate the chainsaw with both hands on the saw. If you must take one hand off the saw to move a limb, or if you are taking more than two steps while the saw is running, you must engage the chain brake. Hold the chainsaw with the left hand on the upper forward handle and the thumb always wrapped around the forward handle bar. This allows an operator to keep the left side of the saw close to the body for better control and handling. In addition to the body, keep legs and hands on the left side of the saw while running the cutting system, which is located on the right side of the saw. By learning how to properly hold and position the saw, and by consistently working from the saw’s left side, an operator will find it much easier to see the angles of the cutting system during operation. Operators should not routinely position themselves directly over the cutting system when cutting. There is no good reason for chainsaw operators to habitually expose themselves to the risk of an unexpected reaction force like rotational kickback.
Potential Reaction Forces
Always be aware of the potential reaction forces that can be caused by the cutting system. Reaction forces can occur as a result of friction on or against the cutters on the chain, or if the cutters become dull and begin grabbing wood fiber rather than smoothly cutting through it. Reaction forces will be different at different points around the bar, and in the opposite direction that a given cutter is moving around the bar. One way to think of a reaction force is to think of operating a common drill used to cut a circular hole. If the drill bit becomes lodged in the wood, your drilling will either cause the wood to turn in the same direction or the drill to attempt to turn in the opposite direction until the tool is powered down.
The four reaction forces include:
• Pull: When you cut with the bottom part of the bar, the saw tends to pull away from you and possibly into the cut.
• Push: When you cut with the top of the bar, the saw tends to push back toward you and possibly out of the cut.
• Pull In: When the lower front quadrant of the chainsaw bar comes in contact with the wood, the reaction force is for the bar and the chain to pull into the wood.
• Rotational Kickback: When the upper front quadrant, or kickback quadrant, of the tip of the chainsaw bar contacts the wood or any other object, the cutters are allowed to go too deeply into the wood because the depth gauge, just in front of the cutter, rotates around the tip of the bar first, exposing too much of the cutter. The cutter will penetrate too deeply into the wood, stopping the chain and causing the bar to rotate inside the chain and suddenly out of the wood.
Be aware that one reaction force can lead to another. For example, when cutting with the top of the bar, the chainsaw can feel like it is being pushed back toward the operator, and potentially cause the kickback corner – the upper quadrant of the tip of the chainsaw bar – to make contact. Or, when cutting with the bottom of the bar, the saw can be pulled forward, pulling the kickback corner into a branch or some other object. In either case, this can cause a kickback, which occurs at a rate seven times faster than a human can react. Proper saw handling, good body positioning, and critical thinking and decision-making go hand in hand.
Reaction forces can be minimized by proper sharpening, chain speed and chainsaw handling. When the cutters are sharp, the depth gauges are correctly set and the chain speed is high, the cutters can do a beautiful job reminiscent of cutting butter with a hot knife. However, if/when the cutters become dull or chain speed is reduced, or both, the cutters produce more friction as the wood offers more resistance, magnifying reaction forces.
Five-Step Felling Plan
OSHA’s general definition of an accident is an unplanned event that results in personal injury or property damage. When cutting and felling trees, it is vital to have and use a felling plan in order to help avoid an accident, and to ensure that every worker on the job has a clear understanding of his or her role in the execution of the plan. The following five-step felling plan incorporates up-to-date cutting methods and is widely used by professional chainsaw operators worldwide.
Step 1: Hazards and Height
Look for tree defects, decay, heavy lean, electrical conductors and anything else that may affect the felling plan. Consider all potential obstacles within the felling site such as people, valuable landscaping, buildings and other structures, pavement and outdoor furnishings. Some can be moved out of the way while others will have to be avoided. Assess the strength and direction of the wind. Decide on the best potential felling direction.
Step 2: Side Lean
Assess the side lean of the tree relative to the felling direction. This often determines whether or not the hinge will hold. Even the very best hinge may not hold up to heavy side lean. Side lean also determines the good and bad sides of the tree. The bad side is the side under the side lean. The operator should be on the good side when making the final release cut.
Before we move on to Step 3, let’s take a moment to discuss the hinge. A proper hinge keeps the base of the tree on the stump as it falls to the ground and controls the desired direction of fall. If the hinge is the correct thickness, the wood fibers will fail gradually and evenly under tension in the back of the hinge and under compression in the front of the hinge as the tree falls. The rule of thumb for hinge thickness when felling trees is 7 percent to 10 percent of the tree’s diameter at the cut depending on the flexibility of the wood fiber, moisture content, wood temperature and the overall diameter of the tree. Hinge thickness is reduced for thicker trees and drier or frozen wood fiber.
Step 3: Escape Route
Determine and walk the escape route before beginning the felling operation. The escape route should be at a 45-degree angle opposite the felling direction or as close to that as possible. Be sure your escape route is clear of obstacles and hazards before beginning.
Step 4: Hinge Plan
The face notch and hinge are critical in directing and maintaining control throughout the felling operation. The face notch is the hinge opening. Plan the size of the opening and the depth and placement of the face notch. Determine the desired thickness and length of the hinge.
To give you some background on notches, the traditional 45-degree face notch was developed many years ago. It consists of a flat cut on the bottom and an angled cut down into it, creating an apex and a 45-degree face notch. One limitation of this notch is that the tree can only fall 45 degrees until the notch closes, and then the hinge must break, causing a loss of hinge control. This limited method was state of the art years ago; remember, the tools of the day were crosscut saws and axes, and the techniques were simply restricted by the technologies.
With today’s chainsaws, limitations have been dramatically reduced and it is now possible to significantly increase safety and productivity. The open face notch is an improvement upon the common 45-degree notch, and is defined as a face notch that is open to 70 degrees or more. This allows the worker to take full advantage of the hinge – provided sound hinge wood exists – with a greater degree of control because the hinge can work much longer before it breaks. Due to this greater degree of control, the back cut can be made level with the apex of the open face notch. With the old 45-degree notch, it is important to step the back cut to help keep the tree on the stump. The open face notch is a classic example of modifying technique in order to maximize technology, safety and productivity.
Step 5: Back-Cut Plan
The back cut is crucial to the well-cut, best-functioning hinge. Forward or back lean may determine what kind of back cut you will use: the straightforward back cut or the bore cut, which is detailed later in this article. The degree of forward or back lean will determine the use of wedges, whether a pull rope will be used and how much power may be required to pull the tree’s mass over the hinge. Remember not to cut into the predetermined hinge when making the back cut, as this can result in immediate loss of control. Always finish the felling cut from the good side of the tree and move into the escape route as soon as the tree begins to fall.
Equipment
Once your felling plan is in place, but before you begin cutting, decide on the equipment that will be used and place it where it should be, making sure everything is ready to go according to plan. What chainsaw will be best to use for cutting this tree? Is it sharp, fueled and running properly? Do you have felling wedges on hand? Will the operator be using block and tackle for mechanical advantage and is it ready to go? Will the operator be using a pull rope and, if so, is it properly set?
Using a Pull Rope
Chainsaw operators use pull ropes because they provide extra assurance that trees will be felled in the desired direction. When a pull rope is used, it must be set high enough in the tree to provide the needed leverage or mechanical advantage from the ground. Be sure that there are no significant defects in the tree below the pull rope because pulling on the rope could cause the top to break off and fall onto workers below when tension is applied.
Do not apply too much tension on the pull rope and do not apply tension too soon. Using a truck to pull trees is a recipe for disaster because there is no way to know if the operator might break the rope. Many people have learned this lesson the hard way. Applying tension too soon can cause the tree to split vertically or cause the hinge to break rather than bend. Remember, the main function of the pull rope is to pull the tree’s center of mass over and past the hinge. Gravity will then bring it to the ground so that it can pivot on the hinge. Avoid creating a pull that could cause a significant twisting action on the tree. This may result in the hinge becoming twisted on the stump, causing it to malfunction and sending the tree in the wrong direction.
It is possible to install the pull rope without climbing the tree. For example, setting a throw line and then installing a larger pull rope can be readily accomplished with practice. A running bowline can be tied from the ground and then pulled into place. Or, many times it is easier and quicker to simply tie off one end of the rope just above the felling cut.
The Bore Cut
The last topic I want to cover in this article is the bore cut, which can be a better, safer way of making the back cut and establishing the hinge. Using the lower front quadrant of the bar and chain to bore/plunge the saw into the tree, the cutter/feller can establish the felling hinge before the release cut is made. Though use of the bore cut does require education, training and practice, it also provides some clear and distinct advantages. One advantage is that it can virtually eliminate the possibility of “barber chairing,” a term for what can take place when a tree splits vertically upward from the back cut, before the hinge is completed. The tree will typically pivot at some point up the split, causing the back section to kick back from the cutout and up toward the person felling the tree. It will then usually crash to the ground in a dangerous, uncontrolled way. Barber chairing is most likely to occur when felling a tree with heavy lean or where significant tension and compression forces exist in the marginal fibers of the tree trunk or section being cut. However, structural defects and environmental factors can contribute to the failure of a stem while it is being cut. So, to reiterate, during Step 1 of the felling plan, an operator should always carefully inspect the tree for structural defects, consider wind speed and direction, and look for and remove any vines or limbs that may be interlocked with other trees.
Another advantage of the bore cut technique is that the predetermined hinge can be completely established to the desired thickness while the tree stays locked on the stump by the back strap. Thus, the integrity and condition of the hinge can be assessed before releasing the tree, giving the operator the opportunity to make any final adjustments before actually felling the tree, or possibly allowing the operator to change his or her mind and start over if something is going wrong, right up until the moment of release.
Starting Corner
Before practicing the bore cut, the chain must be properly sharpened and the saw in good running condition. You must understand the concept of the “starting corner,” the lower front quadrant of the tip of the bar and chain. When making a bore cut, always start cutting into the wood with the starting corner to avoid kickback.
Executing the Bore Cut
Bore several inches into the tree behind the apex of the notch. Be sure to start the cut at the starting corner of the chainsaw bar. Start the cut well behind the desired position of the hinge. Then, once you have bored all the way through the tree, carefully cut forward to create the desired thickness for the hinge. Leave a holding strap of wood at the buck of the tree to hold the tree in place.
Always finish your cutting and release of the tree from the good side of the tree. The side toward which the tree leans is considered the bad side of the tree. So, if you are cutting a tree that is thicker than the length of your bar, you will want to start your back cut from the bad side first, no more than 50 percent and out the back to prevent pinching the bar or having to return to the bad side.
Again, if the tree is larger in diameter than the length of your chainsaw bar, bore cut only about 50 percent through from the bad side of the tree and establish your predetermined hinge thickness on that side. Then, finish making the remainder of the hinge by bore cutting from the good side of the tree to establish your predetermined hinge thickness on that side, slightly overlapping the first cut and out toward the back of the tree, leaving a holding strap of wood that will continue to keep the tree in place.
Now that you have established and completed the desired hinge thickness behind the apex of the face notch, leaving a holding strap of wood at the back of the tree opposite the direction of fall, it is time to execute the final cut.
The final cut releases the holding strap of wood, allowing the tree to fall. After making the final cut, turn off the saw or apply the chain brake, and then move away from the tree into your pre-established escape route at a 45-degree angle opposite the felling direction to a safe position.
Conclusion
Operating a chainsaw and felling a tree alone can be very dangerous. Because of the risks inherent to chainsaws and tree-felling operations, it is imperative that chainsaw operators receive appropriate education and training, and that they never stop learning and working to improve their skills.
About the Author: With more than 30 years of experience in the tree care industry, Ken Palmer is a well-known instructor, speaker, author, and developer of modern tools and techniques. A member of the ANSI Z133 Accredited Standards Committee and the Utility Arborist Association Safety Committee, and three-time International Tree Climbing Championship champion, Palmer has educated and trained thousands of tree workers throughout North America, Western Europe, Australia, New Zealand and Japan.