
Starting From the Ground Up
Whenever we are fortunate enough to see a competent climber working off of a pole or tower, it can be favorably compared to watching a well-oiled machine at work. Each part of the body is coordinated and working together. A person with no understanding of the business might think climbing is something anyone can do. It is not. That climber has, more than likely, spent numerous hours learning his craft and practicing it day in and day out during the course of his duties. Even that climber who looks so graceful had to start somewhere, and that is what we are going to look at in this article – how learning to climb at the bottom of a pole or structure can make you a more competent climber at the top.
Before anyone straps on a set of climbers or puts on a body belt, it is essential that they learn how to position themselves as they approach the pole. The old-timers were given a set of hooks and told to practice during lunch or at home, and some were successful, but the majority of them gave up and are not even interested in the trade anymore. They might even tell war stories about how they tried climbing poles once and they were too smart to keep trying.
Times are different now. If we want someone to be successful or take our place when we are done, we must make an effort to give them the tools to learn how to climb properly. As many of you know, climbing poles is not about your physical attributes. Sure, it helps if you are 6 feet tall and weigh 185 pounds, but size is not what determines a competent climber. Ninety percent of climbing a pole is in the head, and in the head is where we want to get when we are teaching this very learnable skill.
You can talk to the trainee about how he is going to climb and how he will position his body, but until he can put instruction into immediate practice, the trainee will not accept your instructions as readily as when he is facing a pole. Using an available pole is the most effective form of climber training.
The Willbros Training Technique
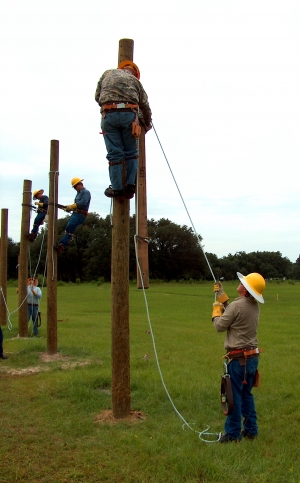
At Willbros T&D Services, based in Fort Worth, Texas, our first step toward training a climber is to take the trainee out to the pole yard, backyard, fencerow or wherever there is a pole that can be used. It does not matter what is on the pole since neither the trainer nor the trainee is going to climb it. We have the trainee place his gloved hands on the pole – not around the pole, but on the sides of the pole. Next, he places his feet at the base of the pole with his heels about 4 inches apart. Then, the trainee leans back until his body is at about a 30-degree angle in reference to the pole, his knees are locked tight and the trunk of his body is perpendicular to the pole. This is not necessarily the best angle for all climbers, but it is a starting point from which other strategies will be learned.
Now we have the trainee pull himself toward the pole and back away from the pole until he reaches that point at which most of his body weight is on his legs and his arms are used primarily for balance. This will be the trainee’s climbing angle. If his shoulders begin to ache to an extreme degree at any time during the following steps, he is using his arms too much to hold themselves and has not yet found the proper climbing angle.
Once the Willbros trainee has achieved the proper climbing angle, it is time for him to simulate stroking the pole with an imaginary gaff. One of the biggest mistakes beginners make when learning to climb is taking too large a step. Our practice is for the trainee to raise his right or left leg between 6 to 8 inches and stroke down, and to then do the same with the other leg. As the trainee is making this imaginary stroke, he brings the knee on the raised leg away from the pole slightly, stepping down and in while stroking. In addition, we ensure the trainee is locking his knee on the downward stroke.
Willbros safety staff recommends that this initial training period last no less than an hour with appropriate breaks for discussion.
Next Steps
If the trainer and trainee are comfortable enough at this point, it is time to strap on some hooks. (Proper selection and inspection of tools would take up more space than this article allows, so let’s assume the climber has been taught the proper way to select the right hook sizes.) We emphasize to the trainee that it is extremely important to use gaff guards when not climbing. The standard practice is not to remove the gaff guards until you are within one arm’s length of the pole. Gaffs are extremely sharp. It is not unheard of for a lineman to gaff himself in the foot or heel while walking with uncovered gaffs.
Since he will now be climbing a few steps, we have the trainee place his right hand at about forehead level. He should then make the same stroke into the pole that he made while standing flat on the ground with his right foot, a 6-inch to 8-inch step. Now, we have him step up and lock his right knee, move his left hand up about forehead level, and step 6 to 8 inches above his right foot and lock his knee. At this point I would have the trainee once again raise his right hand and right foot and step up and stroke in until both feet are at the same level. Stop here. Have the trainee assess his comfort level. Right now he is no more than 2 feet off the ground and should be feeling very secure. We make certain that the trainee’s heels are between 4 and 6 inches apart and that the 30-degree angle discussed earlier is maintained.
One of the strongest desires to overcome is the need to hug the pole. This is exactly the opposite of what needs to be done. Hugging the pole changes the angle of the gaff and could eventually lead to a cutout and slide down the pole.
Once the trainee is comfortable, it is time to descend. The steps will be a little bit longer, roughly about 12 inches, although they could be a little more or less depending on the trainee. The good thing about climbing down is that gravity does all the work – the trainee doesn’t have to strike at anything. The terms used in many Willbros’ training sessions are “look, lock, aim and drop.” Take your left gaff out of the pole, look down at where you are going, lock your knee into place, aim toward the heart of the pole and drop your body down onto the gaff at your aiming point. Do the same thing with your right foot and you should be safely on the ground.
Many companies now require 100 percent fall restraint while climbing. Regardless of your company policy, trainers should be aware that OSHA requires 100 percent fall protection for unqualified climbers above 4 feet. The methods described earlier in this article, however, can be used with or without a belt as long as the trainee does not climb above 4 feet. Below 4 feet, this method of ascending and descending can be used over and over until the trainee has demonstrated a grasp of the essentials. Remember, it is not the height you should worry about, it is the methods that are used to climb properly that are important.
About the Author: John Morton, CUSP, began his career in 1970 as a groundman for Houston Lighting and Power, now known as CenterPoint Energy. In 1997 he accepted a position at Texas A&M University’s extension service as a trainer for the electrical and communication industry, and in 2004 he assumed his current role as director of safety and training for Willbros T&D Services.