


Tricks of the Trade to Improve the Trenching Environment
This is the final installment in a four-part series on trenching and excavation. “Trenching by the Numbers” (http://incident-prevention.com/blog/trenching-by-the-numbers), the first article in the series, presented a simple method for recalling OSHA’s trenching and excavation requirements. The second article focused on soil mechanics (http://incident-prevention.com/blog/soil-mechanics-in-the-excavation-environment), taking an in-depth look at the behavior and characteristics of different soil types and their relationships with water and air. In the June 2016 issue of Incident Prevention, I covered “Protective Systems for Trenching and Excavations” (http://incident-prevention.com/blog/protective-systems-for-trenching-and-excavations). To close out the series, I will present techniques for creating a safer, more productive trenching environment, and then provide some food for thought about how to sell these techniques to management.
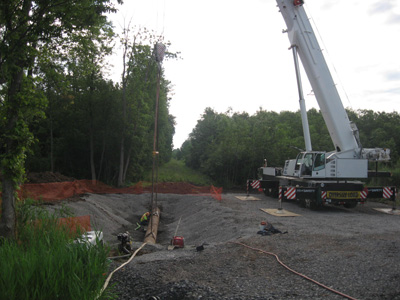
Dewatering Using Well Points
It’s no secret that water can greatly contribute to the success or failure of any trenching and excavation activity. OSHA requires that employers take steps to keep workers from being exposed to standing water conditions. One of the more proactive approaches to dewatering a site is to install well points. A hole is augured into the ground, and a perforated pipe is inserted into it. Then, a submersible pump is placed inside the pipe. This technique can be especially effective in sandy soils.
However, there are two caveats to keep in mind with this technique. First, it works best when performed three to five days before excavating begins. This is because water is self-leveling; thus, when a void is created by the pump, the water in nearby soil leeches into the work area. If excavation activity takes place too soon after the well point is installed, one could misguidedly conclude that well points make conditions worse when, in reality, poor planning and a misunderstanding of the process are to blame.
The second caveat to consider is the number of well points and their placement. There is no magic number as to how many are needed because there are simply too many variables in play. For instance, how high are the water tables? How big is the excavation? Is the excavation site at the bottom of a hill or in a depression? What is the performance ability of the pump being used? I have seen one well point work effectively in a 12-foot-by-40-foot trench. Yet under different circumstances, I have also seen the need for two well points placed at the diagonal corners of an excavation with the same measurements.
Improving Walking/Working Surfaces
Now I would like to turn your attention to two techniques that help to make a trench a more hospitable working environment. These are possibly the easiest, simplest and cheapest methods and – unfortunately – the ones most overlooked.
1. Sloping the Trench Floor
I have never seen it written anywhere that a trench floor has to be perfectly level. Take a minute to look at a garage floor, driveway, sidewalk or street. I doubt any of them were perfectly level when they were constructed. Why? Because they were designed to shed water. Oddly enough, I rarely see this same concept applied to trenching operations.
As a general rule, a half-inch slope for every foot of run can have an immensely positive impact on the working conditions in a trench. When applied to the trench floor of a standard 20-foot trench shield, the total drop in grade would be 10 inches. Considering the rough terrain of most job sites, workers may not even notice such a subtle change in grade. The OSHA standards allow trench shields to be undermined up to 2 feet. In practice, the shield could be level with the floor at one end, undermined 1 foot at the other end and maintain compliance with the OSHA standards.
If your site has two 20-foot trench shields in tandem, slope the trench floor to the center where the shields meet. This way, your trench floor does not get progressively deeper the longer the shield system gets.
Once a trench floor has been sloped, what do we do with all of the water that has been channeled to the end or center of the trench system?
Getting water to go where you want it to go is the hard part. But now that we are intentionally shedding the water to a low point, we know exactly where to put our submersible pump. Going a step further, dig a sump hole at the lowest point; then, take a 5-gallon pail, drill several holes around the sides and insert the pail into the sump hole to keep it from collapsing. This is probably the easiest and least invasive method for dealing with water accumulation issues in a trench system.
2. Spreading Stone
One of the more prevalent and – in my opinion – mishandled challenges in the trenching environment are the muddy conditions that often make up the trench floor. I believe members of management would agree that muddy conditions slow productivity. Moreover, I think utility safety professionals could make a compelling case that such conditions can contribute to cumulative stress and musculoskeletal disorders.
What if I told you there is a solution out there that, depending on where you live in the U.S., costs between $15 and $50? In many cases, all it would take to address the challenge of a muddy trench floor is to spread a ton of stone on it. Stone is a consumable material that, on many jobs, is wheeled in by the truckload anyway. Think about this: For less than $100 we can improve the solidity of the trench floor, keep tools and equipment cleaner, decrease the chances of the trench settling in the future and increase productivity.
Making Your Case with Management
As simple as it sounds to slope trench floors and use stone to handle muddy conditions, you might be surprised how offensive some members of management find these ideas. In fact, they often counter using phrases like “wasting money” or, as I heard one manager argue when it came to potentially using stone, “throwing material away.”
As safety professionals and frontline supervisors, we need to keep in mind that we have a different vantage point than management because we are in the field every day and have firsthand knowledge of the challenges of the working environment. When you put yourself in management’s shoes, it is not difficult to recognize that they see us presenting a problem they may have never even considered and then attempting to fix it with a “more money” solution.
So, how do we resolve this disconnect between field workers and management? Arguably the best way is to present these ideas as cost-saving solutions. For instance, if you could explain to a manager – or better yet, an accountant – that four workers get in and out of a trench on average four times a day (although it is likely more often), five days a week, spending about seven-and-a-half minutes each time cleaning off their boots and tools, you could make the case that the crew is hemorrhaging 600 minutes (4 x 4 x 5 x 7.5 = 600) or 10 labor hours a week for that one activity alone. This does not even attempt to account for lost productivity while working in the trench.
Suddenly, the cost of crushed stone does not seem like the sky is falling. Using this same approach, you could make a case regarding the cost versus benefit of spending a few hours placing well points. In short, making your pitch comes down to understanding the challenges faced by workers in the field and providing solutions to management in their language.
Closing Thoughts
I hope this four-part series on trenching and excavation has provided information you can put to use in the field, and that you have gained a larger appreciation and respect for digging in the dirt. Although most related activities are simple and fairly straightforward, there is a lot employees need to know in order to execute the work the right way, from soil mechanics and behavior to organizational methods and OSHA standards.
Further, this series merely dipped a toe into the deep end of this subject. Layered soil types, combination protective systems, earth stress calculations and many other topics simply were not addressed. Much like anything else in life, there is always more to learn. By continuing to study trenching and excavation, including processes and the forces at work around us, you can take one more step toward ensuring that you and your crews go home safe and healthy each day.
About the Author: Jarred O’Dell, CSP, CUSP, is the safety director for Syracuse Utilities and an instructor at Rochester Institute of Technology’s OSHA Education Center. O’Dell has gained 12 years of experience in the construction and utility industries since serving in the U.S. Army. He can be reached at jarred.odell@syracuseutilities.com.