
Soil Mechanics in the Excavation Environment
The February 2016 issue of Incident Prevention featured “Trenching by the Numbers” (see http://incident-prevention.com/blog/trenching-by-the-numbers), the first installment in this series on advanced trenching and shoring principles. In that article, I reviewed the OSHA excavations standard found at 29 CFR 1926 Subpart P. The purpose of reviewing the rules was to give readers a starting point upon which to build more advanced concepts. In this article, I will continue the series with an in-depth discussion about the principles of soil mechanics.
Throughout the years I have worked in the utility industry, I have observed a systemic deficiency when it comes to training and educating the workforce about soil mechanics. This deficiency impacts nearly everyone, from employees in the field to civil engineers who design the work to be done. In practice, what I tend to see is training that begins with teaching enforceable standards and concludes with an overview of some methods for classifying soils. This is problematic because employers may end up with employees who merely understand how to classify soil in order to comply with a standard, instead of having comprehensive knowledge about how to harness the naturally occurring characteristics of soil to keep workers safe and make jobs run more smoothly.
Understanding dirt is, admittedly, not a difficult feat. However, neither is understanding the concepts of falls, struck-by hazards and caught-in-between hazards, yet according to the U.S. Bureau of Labor Statistics, these have been three of the leading causes of construction worker deaths in this country for many years. This means there is also a potential risk of injury for those individuals who work with soil, so the better the training your employees receive, the safer they can be on the job site.
A Great Place to Begin
The OSHA standards are a great place to begin learning about soil mechanics. Appendix A to 1926 Subpart P, titled “Soil Classification” (see www.osha.gov/pls/oshaweb/owadisp.show_document?p_table=STANDARDS&p_id=10931), contains a number of definitions that are particularly useful. The terms in the section can be grouped into one of three categories: classification terms, characteristic terms or general terms. Classification terms include stable rock, Type A soil, Type B soil and Type C soil. Characteristic terms are those used to describe classification terms. For instance, “cohesive soil” is a characteristic often associated with Type A soil, whereas someone might expect to hear the term “granular soils” during a discussion of Type C soil. General terms include phrases like “soil classification system.”
Let’s first consider classification terms, beginning with stable rock. Appendix A to 1926 Subpart P states that stable rock “means natural solid mineral matter that can be excavated with vertical sides and remain intact while exposed.” This is a pretty clear-cut definition. The OSHA standard’s definitions for soil types A, B and C have a uniform layout. In each case, the requirements for a quantitative soil analysis are given first and followed by the requirements for a qualitative analysis.
There is some debate about the merits of using quantitative versus qualitative methods for soil classification. Before I move on to descriptions of both methods, as well as the merits of each, I want to provide definitions of “quantitative” and “qualitative” to ensure we’re all on the same page. When you hear the word “quantitative,” you can associate it with “quantity.” Essentially, quantitative data is measured using numbers. Some examples include volume, weight, temperature and humidity. On the other hand, when you hear the word “qualitative,” think of “quality.” Instead of being measured using numbers, this type of data is observed and the analyst then forms an opinion based on his or her observations.
Quantitative Soil Analysis
Scientific- and engineering-minded stakeholders tend to prefer quantitative soil analysis techniques to qualitative techniques because, as noted in the previous paragraph, the results of an analysis can be measured. When the quantitative technique is correctly executed, the greatest benefit is a reading that is valid, objective and reliable.
The goal of applying the quantitative method is to determine the unconfined compressive strength of the soil measured in tons per square foot (tsf). In Appendix A to 1926 Subpart P, the agency states that unconfined compressive strength “means the load per unit area at which a soil will fail in compression.” In the field, measurements are often accomplished through the use of a Torvane shear or a pocket penetrometer. The results collected from the device used are then classified into one of the three soil types. Following are the ranges of each soil type:
• Type A soil: ≥ 1.5 tsf (144 kPa)
• Type B soil: > 0.5 tsf (48 kPa) to < 1.5 tsf (144 kPa)
• Type C soil: ≤ 0.5 tsf (48 kPa)
To illustrate, visualize trying to push a steel plate. It has very little give and a high compressive strength. Now visualize pushing an aluminum soda can. It gives very easily and has a low compressive strength. The takeaway here is that the higher the compressive strength, the stronger the soil. Alternatively, the lower the compressive strength, the weaker the soil.
Now that you have a better understanding of how to determine soil compaction strength, give some quick thought as to why this is important. In short, the higher the soil’s compaction strength, the less potential there is for collapse during trenching and excavation.
Qualitative Soil Analysis
Although there are a number of benefits derived from performing quantitative soil analyses, operations and field workers typically prefer to use qualitative methods. Perhaps the biggest reason for this preference is that qualitative analyses do not require the use of a measuring device, which can easily be lost and is expensive to replace.
There are also other benefits to conducting qualitative soil analyses. A competent person trained in this type of analysis can ascertain soil behaviors – such as those of wet and dry soil, clay and sand – instead of just the unconfined compressive strength. This may enable him or her to make better decisions about how to address the challenges of working in various environments.
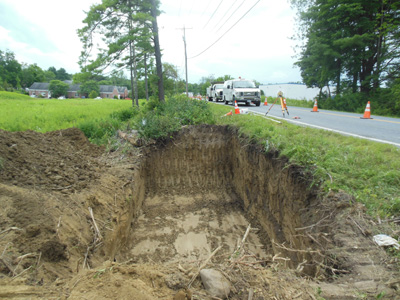
According to Appendix A to 1926 Subpart P, a competent person shall make a soil classification based on the results of at least one visual and one manual analysis. Before performing either analysis, I encourage the competent person to consider the size of the excavation. Samples should be collected from various depths. In addition, depending on how long or wide the excavation site is, the competent person should also confirm that the soil conditions are consistent throughout the proposed excavation area. If they are not, additional safeguards may be required. The safeguards to be used will depend on the depth of the excavation and the soil classification.
Next, the visual analysis can begin. This process is rather straightforward; the competent person literally looks for clues about soil characteristics. For example, he or she can determine if the soil is wet or dry, cohesive or fissured, granular like sand or smooth like clay. We will get into why these attributes are important a little later in this article. I recommend beginning the visual analysis process when earth-moving equipment is used to begin the excavation. Doing so will enable the competent person to get a better idea of gravity’s effect on the soil at the excavation site, determine how water will run off or settle, and discover if the soil has different characteristics at different layers.
Once the visual analysis is complete, the manual soil analysis can begin. I encourage you to take a look at OSHA’s manual testing standard, also found in Appendix A to 1926 Subpart P. In a way, the manual soil analysis can confirm the competent person’s visual assessment, but this process is about much more than that. Specifically, the competent person will stress the soil sample in order to determine its cohesiveness – that is, the soil’s ability to stick to itself.
Many individuals begin a manual analysis by collecting a soil sample and rolling it in their hands, adding or removing soil until the sample is about the size of a golf ball. Some then choose to use the thumb test, in which – as the name implies – you push your thumb into the ball in order to estimate the soil’s unconfined compressive strength. Others choose to roll the ball into 1/8-inch (3.175-mm) threads. After rolling the threads, the competent person dangles roughly 2 inches (50 mm) of 1/8-inch thread to determine if the soil will tear.
Soil and Water
Regardless of whether the quantitative or qualitative soil analysis method is used, water is probably the biggest concern when engaging in excavation activities. Soil with too much water will turn to mud, and soil with too little water will likely fissure and collapse under its own weight. Therefore, field workers want to find a middle range where the water content of the soil is just right. To understand why this is the case, we need to understand the concept of water tension/surface tension.
In one of your grade-school science classes, you may have conducted an experiment in which you used an eyedropper to add drops of water to the top of a penny. As the puddle of water on the penny got larger, you likely noticed that it began to create a dome shape. Eventually, critical tension was hit and the water spilled over. In this simple project, it can be observed that water has strength in limited volume and that too much water will lose cohesion.
Let’s apply this concept to excavating. Water can make up roughly half the volume of soil by occupying open voids. Soil in this state is known as saturated soil. Some examples are mud and quicksand. The hazard with saturated soil is that it can act more like soup, with no ability to be molded. Alternatively, soil with little to no water concentration is dry soil; a telltale characteristic is its dusty and crumbling nature. Saturated soils and dry soils have one thing in common: They lack cohesiveness. In application, the ideal soil will have just enough water content to give the soil cohesiveness without being too dry or too saturated.
Soil Concentrations
After water, the next most important soil characteristic is the concentration of soil types. For instance, according to Appendix A to 1926 Subpart P, “clay, silty clay, sandy clay, clay loam and, in some cases, silty clay loam and sandy clay loam” fall into the Type A soil classification, but what does that mean, and how do we apply it in the field?
The answer is fairly simple. In short, OSHA adopted the soil textural triangle developed by the U.S. Department of Agriculture. By looking at the illustration below, we can see that clay (associated with Type A soils) is at the top of the triangle; silt (associated with Type B soils) is to the right; and sand (associated with Type C soils) is to the left. From an agricultural perspective, knowing the ideal ratio of dry to saturated soil is critical to the success of growing crops. From an excavation perspective, we can use the same information to determine how soil will respond to saturation. For instance, clay-like soils will shed water, channeling it away from or toward an excavation. Silt-like soils will absorb water much like a sponge. Sandy soils do not hold water and will have the largest air voids.
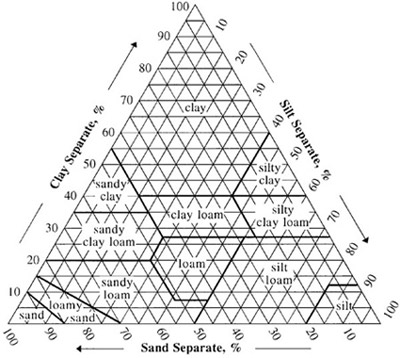
In addition, the textural triangle can tell us the relative weights of the soils we may encounter. Clay will be the heaviest of the three types. Silty soils fall in the middle, leaving sandy soils as the lightest.
Conclusion
To recap, the purpose of this article has been to provide field foremen and crew chiefs with some in-depth information about soil mechanics. In the next installment of this series, scheduled to appear in the June 2016 issue, we’ll take a look at protective systems for trenching and excavation environments. If you have any questions about anything you’ve read so far, I encourage you to email me at jarred.odell@syracuseutilities.com. In the meantime, stay safe and stay healthy.
About the Author: Jarred O’Dell, CSP, CUSP, is the safety director for Syracuse Utilities and an instructor at Rochester Institute of Technology’s OSHA Education Center. O’Dell has gained 12 years of experience in the construction and utility industries since serving in the U.S. Army. He can be reached at jarred.odell@syracuseutilities.com.